
Crochet Cat Paw Fingerless Gloves (Part 1) – Free Tutorial
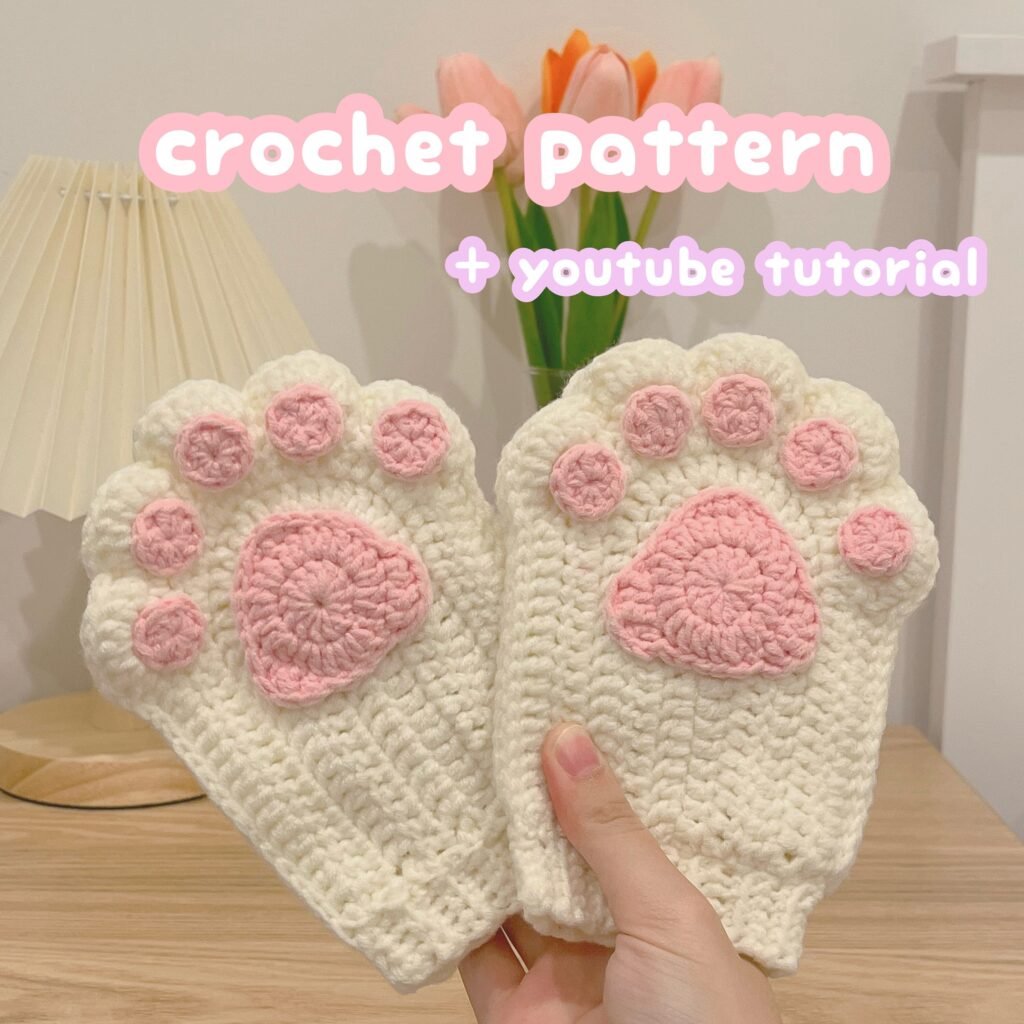
How to Crochet Cat Paw Fingerless Gloves (Part 1)
Crochet cat paw fingerless gloves are one of the cutest and most popular crochet accessories right now. In this free beginner-friendly tutorial (Part 1), you’ll learn how to make crochet cat paw fingerless gloves step by step, even if you’ve never crocheted before.
This guide is Part 1: you’ll make the main white “paw shape” and the scalloped “toes,” and you’ll start the next round.
(In Part 2 you’ll finish the pink paw pads, assemble the glove pieces, and add the ribbing.)
Crochet Cat Paw Fingerless Gloves (Part 1): Materials & Sizing
- Yarn: 5-ply yarn in white + pink (or any colors you love)
- Crochet hook (choose based on hand size below)
- Scissors
- Stitch marker
- Yarn needle (darning needle)
This crochet cat paw fingerless gloves pattern is designed to be slow-paced and beginner friendly, with detailed explanations for each round.
Glove Sizing (Very Important)
The sample glove fits a hand with these measurements:
- Wrist width area: ~ 8 cm
- Hand length area: ~ 16 cm
Use this sizing rule:
- Small/average hands: 5-ply yarn + 3.5 mm hook
- Slightly bigger hands: 8-ply yarn + 4.0 mm hook
- Big hands: 10-ply yarn + 4.5 mm hook
✅ Tip: If your crochet feels tight, your glove will be small. Go up 0.5 mm in hook size.
Crochet Terms (Super Simple)
- ch = chain
- dc = double crochet
- sc = single crochet
- sl st = slip stitch
- st = stitch
- increase (dc inc) = 2 double crochets in the same stitch
PART 1 — White Paw Base
Step 1) Make a Slip Knot + Chain 16
- Make a slip knot and put it on your hook.
- Make 16 chains.
✅ How to count chains: count the little “V” shapes. You want 16 V’s.
If you accidentally do more (example 18), don’t panic — just “frog” (pull yarn back) until you return to 16.
Step 2) Round 1 — Double Crochet Across + 6 DC in Last Chain
You will start by making double crochets down the chain, then create a rounded end.
- Yarn over and make your first dc in the 2nd chain from the hook.
- Keep doing dc in each chain until you have 13 dc.
- In the very last chain, make 6 dc all inside the same chain (this creates the rounded “paw top”).
- Now you will work along the bottom side of the chain (the other side of your foundation):
- Continue doing dc along the underside back to the beginning.
- You will end with a shape that looks like an oval/rounded paw base.
✅ Tail tip: as you crochet back along the underside, crochet over the tail to hide it (so less weaving later).
After Round 1:
- Chain 2 (this gives height for the next round).
Step 3) Round 2 — 13 DC + 6 Increases on the Curve + 13 DC
This round shapes the curve more.
- Chain 2, turn.
- Do 13 dc (straight section).
- Put a stitch marker at the end of the straight section — this marks where the curve/increases begin.
- On the curved top area: make 6 dc increases
(so: 2 dc in each of the next 6 stitches). - After the curve, you return to the straight side: do 1 dc in each stitch until you reach the marker zone again and finish the round.
✅ If you’re unsure: count from the stitch marker to check your stitches.
Then:
- Chain 2, turn.
Step 4) Round 3 — Straight DC + “DC then Increase” on the Curve
Round 3 uses a gentler increase pattern to keep the curve smooth.
- Work 1 dc in each stitch on the straight section until you reach the stitch marker.
- On the curved section, repeat this pattern:
- 1 dc, then 1 dc increase
- 1 dc, then 1 dc increase
- Continue until you reach the marker again.
- Finish the rest with 1 dc per stitch to complete the round.
Then:
- Chain 2, turn.
Step 5) Round 4 — Straight DC + “Increase then 2 DC” on the Curve
This round increases again but spaced differently.
- Straight section: 1 dc in each stitch until stitch marker.
- Curved section: repeat 6 times:
- 1 dc increase
- 2 dc (one in each of the next two stitches)
- Finish the straight section with 1 dc per stitch.
Now fasten off:
- Chain 1, pull yarn through, cut, and tighten.
✅ IMPORTANT: Make sure you’re working on the right side for the next step (the side that looks smoother).
Step 6) Round 5 — Scallops (The “Toe Beans” Shape)
This is the fun part: the scallops make the paw “fingers.”
Where to start
Look at Round 1 and count stitches from the right side. Insert your hook into the 14th stitch from the right.
Scallop pattern
You will repeat:
- sc
- skip 1 stitch
- In the next stitch: 6 dc in the same stitch
- skip 1 stitch
- sc in the next stitch
Repeat this across to form multiple scallops.
Finish:
- Join with sl st (slip stitch) to secure.
- Cut and tidy tails (don’t cut tails you still need to sew later).
Step 7) Round 6 — Start the Bottom Section (Beginning of Next Part)
Now you begin working on the lower part again.
- Insert hook into the first stitch and attach yarn.
- Chain 2 (doesn’t count as a stitch).
- Make your first dc in the same stitch.
- Continue with 1 dc per stitch for the straight area.
When you reach the scallop area, the shaping changes (the video uses a repeated sequence like: 2 dc, 2 increases, 2 dc, then sc at the lowest point).
This part is usually where people prefer to follow Part 2, because assembly + paw pads come right after.
After You Finish Part 1, You Should Have:
✅ A clean white paw piece with scalloped “toes”
✅ Minimal tails (hidden inside stitches)
✅ Ready for Part 2 (pink pads + sewing + ribbing)
Quick Tips So Your Gloves Look Professional
- If it’s too tight: increase hook size (example from 3.0 → 3.5 mm)
- Keep the same tension all the way
- Use a stitch marker to avoid losing the “curve zone”
- Hide tails as you crochet whenever possible
Once you finish Part 1 of these crochet cat paw fingerless gloves, you’ll be ready to continue with Part 2 where we add the pink paw pads, assemble the gloves, and finish the ribbing.
If you enjoy cute crochet projects, you may also like this easy crochet bee pattern.
This pattern uses standard US crochet terms (source: Craft Yarn Council).